|


| |
1.
determine Panel location
The first step in installing a
system is to determine where they will go. This is predicated on proper
system design (see system design):
- Proper panel sizing to pool
surface area
- 50-100% of pool's surface area depending on location, climate, desired
season, etc. Every situation is different so contact us with your
information and we will assist you design your system.
- Panel orientation(s)
- Preferably between SE and W--SW is best usually.
- Mounting surface
Mounting
Surface considerations
- ROOF OR RACK. Installing FAFCO solar panels is a fairly straight-forward process.
The panels connect together the same way in all situations but how they are
mounted is directly dependent on what they are mounted to; whether on a rack
or a roof and what type of roof. Racks can either be roof or ground mounted (see
Panel Racks). You can also build your
own racks out of wood or strut channel, etc., but durability and/or aesthetics
should be considered.
Remember, solar pool systems can last well over 20 years so the structure they
are mounted to should too.
- For all surfaces, if potential abrasion of the underside of the panels
is possible, put corrugated sheets under panels for protection.
- 26" wide sheets in 8, 10, or 12 foot lengths are usually available at
most building suppliers like Home Depot.
- ROOF OBSTRUCTIONS will determine panel
layout
- Remember panel headers are actually 51" wide (figure 52" to be
safe) and 8, 10, or 12 feet
long. Leave at least 3" top and bottom to secure mounting hardware.
- Plumbing and/or roof vents, skylights, chimneys, etc. can interfere with
panel location.
- It's OK to put gaps between panels to go around such items using Sch. 40
PVC pipe
- Also see "Plumbing Panels Together" later in this
installation instructions.
- Use FAFCO CPVC female adapters (#5381) at all panel coupler / PVC
connection
- Every gap or split will require two more rubber couplers, four s.s.
clamps, four female adapters and maybe more tie down cleats depending on
width of split.
- PITCH OF THE ROOF
can be an issue at the extremes (i.e. too shallow or too steep).
- FAFCO panels
should not be installed on a flat surface anyplace where there is the
possibility of freezing conditions. The panels will not drain completely
laying flat. Pitch must be greater than 6 degrees or a 1.25:12 slope
(1.25' vertical rise per 12' horizontal distance)
- Don't rely on using positive air pressure to evacuate any water from flat installations.
- Thus, flat roof installations are out unless in warm climates
like Hawaii. Otherwise it would be necessary to build racks to pitch panels
at least 6o. See information on building either a steel
strut or wooden panel racks (Panel Racks)
- EPDM rubber panels can often be safely installed on flat roofs in some
cooler climate situations because they can usually expand enough to avoid
damage.
- We offer a rubber system for these situations only, however, long-term
durability of these products is an concern. EPDM tends to degrade from
water chemistry.
- Steep roofs (>6:12) can
be a problem too--safety needs to be prime objective in this case.
- The further you get away from a direct southerly orientation, the more
steeper pitches reduce performance. Add surface area in these cases.
- TYPE OF ROOF is a major issue with regards to how the panels are
mounted. The following is a very brief description of some of the most
common roofs and the mounting procedure for each:
- General roof installation issues for all roof types:
- Panel hold-down cleats should secure to the sub-roof.
- Panels do NOT need to secure to roof rafters unless strut channel is used.
- Use 1/4" hex head lag bolts of whatever length is needed per roof
type.
- Use galvanized or stainless bolts as needed depending on climate
and availability.
- Bolt should penetrate through the sub-roof about 1/2" for best
hold.
- Be careful of what's under sub-roof (attic, vaulted ceiling, open beam
ceiling)
- See Sub-roof section below.
- Be careful not to overtighten bolts that could strip sub-roof and not hold
well.
- SEAL ALL ROOF PENETRATIONS. Be
sure to seal all roof penetrations thoroughly with a good quality exterior asphalt/plastic-based
sealant like Henry's 208 (only on asphalt roofs) or polyurethane sealants like Henry's 900, Sikaflex or Vulcumseal
generally available at Home Depot.
Avoid silicone! Use sealants in a tube that fits into
standard caulking gun. Remember, properly sealing the roof is the
best insurance from future roof leaks. When in doubt, use more
sealant. Use enough so excess squeezes around edge of tie-down cleats.
- Asphalt-based roofing material
- Comes in shingle or rolled
configuration
- Usually installed over a plywood sub-roof
- Easiest roof for mounting solar panels
- Requires no special attention if at least modestly pitched; >1.25:12
- Use minimum 1/4" x 2" lag bolt to secure "tie-down cleats" into
and through plywood
- Also be sure of the roof thickness since these roofs are often reinstalled
over existing roofing. This would determine need for longer lag bolts.
- Wood cedar shake shingle
- Usually installed over felt and 1x6" sheathing boards @ ~1' o.c.
- Watch for nail heads or staples pushing out of roof. Re-nail or
remove.
- Clear any sharp objects off roof including branches and sticks
- Necessary to pre-drill shake only (but not sheathing boards) wherever
bolts need to go to avoid splitting shingle. Use 1/4" or bigger bit
for 1/4" bolts.
- Note and seal all split shakes or use metal flashing underneath. It
is actually a good idea to put metal flashing at all roof penetrations.
- Use minimum 1/4" x 3 1/2" lags in most cases.
- Use plenty of sealant since it is cheap insurance against roof leaks.
- Squirt sealant down hole of pre-drilled shingle before lagging
- Another option is to use strut channel to minimize penetrations (see
below).
- Tile -- concrete, clay, or composite.
- Usually over plywood or sheathing boards depending on age of roof
- Some tile are difficult to walk on without causing damage,
especially clay
- When walking on roof, face up-slope of roof and put weight
(your heel) on "toe" (front edge) of tile course where the
courses overlap so it is stronger
- Recommend strut channel to minimize penetrations (see below)
- Need to pre-drill concrete tile with masonry bit.
- Clay tile probably needs to be removed and replaced with asphalt roofing
where panels need to go.
- Run asphalt roof from above panel location to eave.
- Once panels are installed, tile can be put back around panels as a facade.
- Metal (steel or aluminum)
- Usually over sheathing boards or plywood.
- Many designs and profiles.
- Screw head location is critical to installation methods
- To protect panel from screw heads abrading the underside of panels, use
corrugated sheets under panels or exchange hex head screws with pan heads or
cover screw heads with dollop of sililcon and let it set-up before
installation.
- Can often mount directly to roof but, because of varied contour, strut channel is recommended on many
profiles
- Contact us with picture and/or cross-sectional drawing of roof to
determine best method
- Standing-seam roofs require special consideration
- Special S-5 clamps are available to attach to seam and avoid any need to
penetrate roof.
- Pitch and gravel (or tar and gravel).
- No longer common, thankfully
- Difficult to seal to due the granular nature of the gravel
- Gravel must be cleared wherever tie-down cleat connections are made to
roof
- Use corrugated sheets under panels to protect them from abrasion from
gravel
- Recommend re-roofing with another roof type or contact us for
more detail mounting instructions.
- SUB-ROOFS
are important too. This is the structure to which the roofing is secured. If you have an attic area under the panel location,
you can always check out the type of sub-roof you have. You shouldn't
need to get up into the attic to mount panels to roof unless using racks.
- This is usually plywood or sheathing boards
- What's under the sub-roof is most critical since you don't want lag bolts
sticking through your ceiling.
- CEILING TYPE. You need to determine if you have standard
flat ceiling with attic above, vaulted, or open beam ceilings.
All these site issues need to be addressed before mounting procedure is
determined.
- Open beam ceiling probably should use strut channel to secure
to beams rather than the tongue and groove (T&G) boards across them, especially when only 1"
thick.
- You don't want to use lag bolts that can potentially penetrate through
ceiling.
What is strut channel?
Strut channel is steel and comes in a low profile steel design (roughly 13/16"
x 1 5/8") or high profile that is 1 5/8" square. It goes by many names but is readily available from electrical
wholesale outlets, Home Depots (galvanized or zinc-chromate gold) or Lowe's (zinc chromate).
We recommend the chromate type since it is more durable in
adverse climates like Hawaii or coastal situations but galvanized is usually
fine too. It cost about
$1.20/foot.
- Strong and durable with rounded edges
- Multi-slotted for ease of mounting as needed to roof rafters or rack
supports
- Slots are large so use fender washer when bolting together
- Allows for fewer roof penetrations on tile and metal roofs or with open
beam ceilings
- Uses strut-nuts that lock onto strut channel--very
cool
- strut nuts come with various threaded hole sizes. Use 1/4" since our
cleats have only a 1/4" hole.
- Panel cleat attaches to strut nut using a 1/4" x1" machine screw
- Click on following pictures for, larger, more detailed view
|
|
|
|
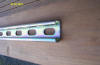
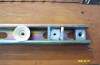
cross-section of strut
|
|
|
|
top view
|
|
|
|
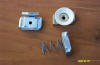
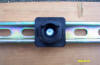
three types of strut nuts
|
|
|
|
nuts attached to channel
|
|
|
|
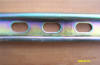
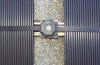
panel tie-down cleat with strut
|
|
|
|
|
|
|
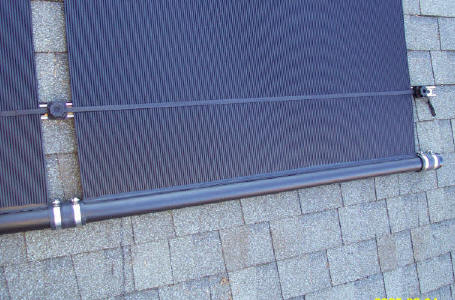
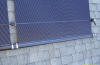
strut shown under mounted panel
|
|

|
|
strut at end of panel bank
|
|
|
|
mounted panel
|
|
|
|
Copyright © 2001
ecosystems. All rights reserved.
Page last updated:
May 28, 2014
|